Description: If you have an Exchange, Microsoft 365, or Outlook.com account, you can send a sharing invitation to other users so they can view your calendar in their own Calendar list.
Calendar sharing isn't limited to the default Calendar folder that is created in all Outlook profiles. You can create additional calendar folders and choose which of those folders to share. For example, you can create a calendar folder for a specific project and share it with your co-workers. Optionally, you can grant them permission to modify the events and appointments in the calendar.
How-to Steps: Share your Microsoft 365 or Outlook.com calendar with people inside or outside your organization
Outlook Classic:
-
From your Calendar folder, on the Home menu, select Share Calendar.
-
Choose the calendar you want to share from the drop-down menu.
-
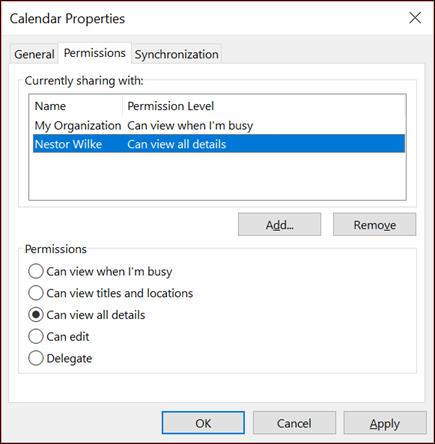
In the Calendar Properties dialog box, click Add.
-
You can search for people from your address book or type in their email addresses in the Add box. When you're done adding names in the Add Users dialog box, click OK.
-
Back in the Calendar Properties dialog box, select the person's name or email address, then choose the level of details that you want to share with the person, then click OK.
-

-
The person you've shared your calendar with will receive a sharing invitation by email.
-
Once the recipient clicks Accept, they'll see your shared calendar in their calendar list.
New Outlook
- From your Calendar folder, on the Home menu, select Share Calendar.

- Choose the calendar you want to share from the drop-down menu.
- In the Sharing and permissions dialog box, search and select the user(s) you would like to share your calendar with.
- Toggle the permission level with the drop-down menu before sharing.

- Select Share
- The person you've shared your calendar with will receive a sharing invitation by email.
-
Once the recipient clicks Accept, they'll see your shared calendar in their calendar list.
How-to steps: Stop sharing your calendar
At any time you can revoke access to your calendar. Note that it may take a while for Microsoft 365 and the user's Outlook to sync and remove the view to your calendar.
-
Click Calendar.
-
Click Home > Calendar Permissions.
-
On the Permissions tab, click the user's name and then choose Remove.
-
Click OK.
Here's a video that also goes over this process:
Additional Information:
- Search or browse our online Knowledge Base
- Call the CCRI IT Help Desk at (401) 825-1112